Pages

May 3, 2014

One Minute: Bezel stone earrings


What you will need:
  • 2 earring hooks
  • 2 matching, pre-bezeled stones from an arts & crafts supply store.
  • optional - jump rings (to create more space)
  • pliers

Turquoise earrings:
With the pliers slightly open the bottom of the earring enough to slide on the bezeled stone.  Use pliers to close the bottom of the earring.

White and grey earrings:
With the pliers, open a jump ring and connect one grey bezeled stone to one white bezeled stone.  Then close the jump ring tightly.
Using the pliers again, open the bottom of the earring enough to slide on the top of the grey bezeled stone.  Close the bottom of the earring with the pliers.

May 2, 2014

Summertime bracelets

I am not normally a wearer of bracelets, but when I found this diy, I loved the bright, summery colors used in the bracelets.

So, I made myself two: one with silver fixtures and light blue and coral string.  And the other with gold fixtures and orange and pink string.  What's additionally fun about this diy is the color options are endless!

My two DIY summertime bracelets

Learn how to make for yourself, here.

April 28, 2014

A variation on bombay hoops

Some of my favorite hoop earrings that I made are these, the bombay hoops.

I made a variation on them, with beads in one of my favorite colors.  Now these are my favorite hoops!:

The how to is very similar to the original bombay hoops.
What you need:
-a pair of wire hoops
-a pair of earring hooks
-a thin wire, 24 or 26 gauge (I used a fun blue wire for these).
-16 beads (8 for each earring).
-pliers
-wire cutters

First, cut a piece of thin wire, about 20 inches long.  Fold one end over the hoop and use the pliers to wrap it around the hoop tightly.
Put a bead onto the wire and loop it through, then loop the wire another 3 times, to keep with the pattern.
Continue this process until all 8 beads are on the hoop.
Be sure to wrap the wire three times after the 8th bead and use the pliers again to tighten it.
Cut the wire closely to the hoop at both ends with the wire cutters and use the pliers to wrap the remaining bit around the hoop.
Use the pliers to connect the top of the hoops.  Slightly open the bottom of each earring hook and connect one to each wire hoop.  Close the bottom of each earring hook.

And all done!


November 10, 2013

In Pursuit of Suede String & Tassels

As you can see by what I post on this blog, I've recently been making jewelry with tassels.

When I found this picture of suede tassel earrings, the colors appealed to me: thin turquoise suede, ruby red beads and gold fixtures.

Anthropologie faceted fringe drops
As I tried to find materials to make these earrings, I found that the thinness of the suede is a large part of the effect these earrings hold.

So, my first move was to try to cut my thicker strings of suede in half.

I first used an X-Acto knife.. it was very difficult to cut evenly through the suede string with it.

Then I tried using sewing scissor, the sharpest scissors I could imagine.  With much fear for my fingers, I was able to cut the suede string thinner.

...But then the suede string fell apart.

Rather than waste more of the suede string, I just went to the art supplies store and bought thinner suede string.  AND, I also got some thin leather cord - and made two pairs of earrings!

My DIY Earrings.
What you need:
- The thinnest suede or leather cord you can find.
- Very thin wire.
- 2 of the same glass bead.
- 2 head pins with rounded top.
- A pair of earring hooks.
- Round-nose pliers and a wire cutter.

What to do:
1. Place each bead on a separate head pin.
2. Use the round nose pliers to close the head pin into a loop.  Make the loop a bit larger than normal - the suede string needs to go through it.
(The loop you made is pointing downwards)
3. With pliers, add an earring hook to the top of each head pin.
4. Determine the desired length of the tassels for your earrings.  The black pair above are about an inch and a half.  For the tan pair, they are over two inches.
5. Double the length you decide on and cut 3 to 4 pieces.
6. Fold the cut pieces in half and put one end through the loop at the bottom of the bead.
7. Start slowly and tightly wrapping the thin wire around the top of the folded suede.
8. Once you wrap the wire to desired thickness around the suede, cut with the wire cutters, and fold the raw edge in with the pliers.
9. Trim the ends so they are even.

That's all!


November 9, 2013

Girly pink, edgy spikes

On a recent visit home, I got to spend some much needed time with my jewelry supplies.  For months I had saved pictures of jewelry that I liked in anticipation of my reunion to my bead boxes.

A style of necklace that I started to see a lot involved at least 2 rows of chain, lots of head pins, and a repetitive pattern of beads.

Some examples:
Examples of necklaces with the 2+ chain style, from my Pinterest board.

With the second necklace in mind especially, I selected the beads and chains I liked best for my DIY necklace.

My DIY Necklace
What you need:
- A chain with small links
- 14 flat headed head pins in the same color as the chain.
- 4 different types of beads in increasing sizes, 14 of each.
- Spikes or other elongating bead (tear drop, leaf shape, etc), 14 of each.
- Round-nose pliers and wire cutters.
- Clasp and jump rings

Directions:
1. First, measure out the chain required for each row of the necklace.  I had 14 columns of beads, and I put a space of 3 chain links in between each column.  Therefore, my 3 rows of chains were each 53 links in length.
2. Next, slide one of the smallest beads onto the head pin.
3. Put the head pin with the bead through the first link of the first row.
4. Add the next bead of incremental size onto the head pin and put the head pin through the first link of the second row.
5. Add the 2nd largest bead onto the head pin and put the head pin through the first link of the third row.
6. Add the largest bead onto the bead pin and use the round-nose pliers to close the pin.
7. Add the spiked bead to the end of the closed pin with a jump ring.

Repeat steps 2-7.  For this necklace I did steps 2-7 fourteen times and with 3 links in between each head pin / column.

8. Once the bulk of the necklace has been assembled, add a chain to each end of the top row.  Attach a clasp and jump rings to the end of the chain you just added.

All done!

I made my necklace with light pink, turquoise blue and silver beads, and silver spiked beads.  I like the girly, yet edgy feel of the necklace.  Unlike most DIY creations made from pictures, this necklace sits very well on. And I love finding different outfits to pair it with!


July 6, 2013

Chain of Change


Life is in serious transition mode now.. In all of this change occurring, I am trying to keep in mind the adage,

"Every end is a new beginning."


After a year, I've decided to postpone my return to America and continue living abroad.

Though there are so many changes now, what hasn't changed is my continued search for inspiration and love for DIY :)

I made this jump-ring chain necklace a while ago now and am still waiting for the perfect opportunity to don it.
MariaFrancescaPepe Tubular Chain Bracelet

The inspiration came from a picture I found on Pinterest (of course!) of a MariaFrancescaPepe bracelet.

After studying the picture for awhile to deduce how the jump rings were attached to each other, I set to work.

At its most basic form, all you really need to make this is A LOT of jump rings, pliers (or two pairs to save your fingers!), and a clasp... and patience.

How To:
(I made these pictures in hopes of making the instructions as understandable as possible!)
1. Open a smaller jump ring (or a chain of them or a paper clip) and slide on two jump rings.
2. Open and add two jump rings perpendicularly to the first two grey jump rings.
3. Push the blue jump rings back (so that they are parallel with the smaller jump ring). 
4. Slide the grey jump rings open so they make a 'V' and have the blue jump rings come forward.  Open two more jump rings and attach them to the blue jump rings.
5. Add two more jump rings perpendicular to the green jump rings you just added.  This is the same thing you did in step 2.
6. Push the purple jump rings back (so they are parallel with the blue jump rings.  Again, this is the same as step 3).
7. Slide the green jump rings open so they make a 'V' and have the purple jump rings come forward.
8. Open two more jump rings and attach them to the purple jump rings.

Pretend these two new jump rings are the green jump rings in step 5 and that you now need to add purple jump rings and then light grey jump rings
Keep repeating steps 5-8 until you get to your desired length.  Add a smaller jump ring to the end and a clasp.
A beautiful jump ring chain made (hopefully!) easy!

I decided to make a necklace instead of a bracelet - thoughts?


May 19, 2013

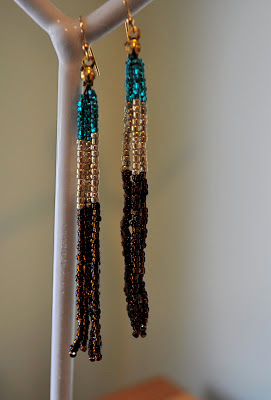
Tri-Color Tassels

Some more tassel earrings! Hurray!

These are super simple DIY earrings made from string and 3 colors of seed beads.
my DIY earrings

What you need:
-2 earring hooks
-2 bead tips
-nylon string (preferably in the color of the lowest color bead, in this case, brown)
-3 colors of seed beads (or more if you'd like).
-needle
-scissors
-pliers

First, cut 10 pieces of nylon string, about 4 to 5 inches each, depending on how long you want the tassle.
Then, string one bead of the last color onto one end of a cut nylon string.  Pull bead to middle and fold in half.
After folding the string in half, you can put a the two string-ends through a needle to make your life easier.  String all the following beads onto the needle so the first bead is stuck at the bottom (and no knot is needed at end to keep the beads on!).
Put as many beads of each color as you like.  Lots of freedom here!
Leave yourself plenty of room at the top.
Make 10 of these beaded strings.
With 5 beaded strings, slip the remaining string through the bead tip.  Knot the tops of the strings well so they cannot slip through the bead tip.  Cut the excess string.  Use the pliers to close the bead tip.
Repeat with the second set of 5 strings.
Use the pliers to open the bottoms of the earring hooks and slip on the bead tips.  Use pliers to close earring hooks.
All done!                   
                                          Wearing my DIY creation:

The most time consuming part of this DIY is definitely stringing all of the seed beads!